How to go INSANE, in a few easy steps…
Posted in Geeking Out, Technology, Uncategorized on September 11th, 2005Or, “How to repair the mirror box squeak on a Canon AE-1″.
NOTE: This procedure is applicable to ALL Canon A-series cameras, however, each one differs. Be sure to get the service manual for the proper model before starting!
I regret not taking more photographs of this procedure… however, I do have another AE-1 around that could use it, so this post will probably be updated with more photos when I do it on that one.
Background: The Canon AE-1 was one of the most advanced cameras made, at the time when it came out. It was one of the first cameras to use digitally timed shutter speeds, replacing a whole pile of mechanical linkages with a ‘microprocessor’ timing circuit (more like a bunch of shift registers, if you ask me… but hey…) and electromagnets to control the shutter curtains.
Unfortunately, there’s one part in there that wasn’t lubricated with the most advanced lubricant available at the time… the mirror damper.
To reduce the ‘mirror slap’ which otherwise occurs when the mirror assembly is flicked up and down by the springs, Canon fitted a rotary damper, which works a bit like the governor on a music box. The last step of this mechanism is a small brass flywheel, which runs on a metal shaft. Over time, the lubricant on this shaft dries up and the wheel squeaks. It will initially just be a slight squeak, eventually, in severe cases, becoming a horrible squelch and finally throwing off the camera’s timing, or even jamming it completely!
There are instructions on the web for lubricating the mirror damper using a needle - I could not see ANY possible way this would work on the AE-1 Program I worked on!
Anyway, here’s my advice. If you’ve got the time and money to send the beast out for repair, do that.
If you don’t want to spend the money on the repair, or it absolutely must be working by tomorrow… set aside about four hours, a nice clear workbench, and a calm state of mind.
Tools required: Small Phillips screwdriver, soldering iron, synthetic lubricant, sewing pin/needle/small piece of wire, spanner wrench. The first three are available at Radio Shack; the fourth should just be lying around. The fifth is pretty exotic, but you can substitute the tips of a small pair of needle-nose pliers. If they aren’t small enough, you can use a grinder to reduce them to points.
Warning: If you’ve never soldered before, practice on a dead piece of gadgetry. The flex circuit boards in the AE-1 take VERY little heating to solder and desolder wires on, and WILL be damaged by excessive heat! It takes much less than 1 second to solder or desolder a wire connection on them.
First step: Get the appropriate service manual for your camera! For the AE-1 Program, the service manual is on this great page of information. (Thanks!) Put a battery in the camera and release the shutter, if it isn’t already.
Remove the camera back. On the AE-1, it comes off with a small latch at the hinge, as it was made to be user-interchangeable. Otherwise, just leave it on. Be careful not to hit the shutter curtains with your fingers or anything else!
Follow the service manual’s instructions to remove the top cover. On the AE-1 Program, the front fascia around the lens mount has to come off first, followed by all the gadgetry on the top of the camera. The wind lever has a strange nut on it that requires a spanner or pair of needle nose pliers to unscrew. The snap rings can be dealt with carefully with a small (jeweler’s-size) flat-blade screwdriver. Carefully peel off the leatherette on both sides. Lift up the top cover, desolder three wires to the flash shoe and PC connector, and you’re in. The bottom cover should be removed as well.
Then go through the service manual’s procedure to remove the mirror box. (I’m not going to try to describe it here.) You’ll be desoldering two more wires.
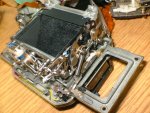
Finally, you’ll be able to remove the mirror box.

The small brass flywheel is the only thing you should lubricate. Apply a small amount of lubricant (I used the Teflon/silicone stuff that comes in the Radio Shack ‘precision lubricator’ tube) to the ends of that by sticking a droplet to a needle or pin, then transferring that to the shaft at the end of the flywheel.
Before putting the mirror box back in, make sure the large electromagnet on the bottom is in its released position, and that the mirror release tab is in the right place. Otherwise the camera will not wind correctly. Before reinstalling all the screws/wires/etc, hold the mirror box in place, put the cam and lever back on the wind shaft, and make sure it winds correctly. (The wind lever must lock at the end of the stroke.)
Finally, you’re done… in one easy for me to say step… put it all back together again, and enjoy!