Archive for the 'Geeking Out' Category

How to deconfuse an Istobal M9+…

Posted in Geeking Out, Technology on June 16th, 2008

Problem: You’ve got an Istobal M9+ car wash sitting in front of you, and it’s confused. In this case, it’s not at its home position, and can’t figure out how to get back there, although there are no other mechanical or electrical faults.

Solution: Open the protective cover over the control panel. The display should read “Place machine at initial position”. At the bottom of the keypad are four nice little buttons with pictograms above them for retract top brush, retract side brushes, move gantry, and A -> B.

WARNING: Before touching any of those buttons, do a careful safety check. Remove the vehicle from the bay, if applicable. Perform a visual inspection of the machine and look for any damaged parts, foreign objects, or visible signs of major collision with a vehicle. Ensure that all persons are, and remain, clear of the machine. Locate the emergency stop button in case it’s needed (on the machine I was playing with tonight, it was on the side of the control panel). Remember, you’re going to have a few hundred pounds of robot under manual control, and it’s sorta your responsibility to ensure compliance with Asimov’s Laws……

Now, as for those buttons — take a guess at which one will move the machine home…….

If you guessed the one for “move gantry” — Nope! Pressing and holding this button will cause the gantry to move, however, all it’ll do is move in one direction briefly while you’re holding it. If you hold it too long, the machine will hit the end of the track and bounce off disturbingly. I’m guessing this button is only used for manual positioning, clearing a jam, or something like that.

Ok, now that you’re done playing ultra-slow-speed Carwash Pong… press and hold A->B. The machine should move home, and, if you’ve paid for a wash package already at the activation terminal, you should get a nice happy green light to enter. Be sure to close the protective weather cover on the control panel again before using the wash!

In case of emergency…

Posted in Geeking Out, Uncategorized, Universe-Flavored Pudding on May 3rd, 2006
From: Train Man!0xDEADBEEF

As a proud cattle member of the commuting public here in South Florida, I ride Tri-Rail sometimes. And, like any other trains, Tri-Rail passenger cars have various features onboard designed to ensure safe evacuation of passengers and crew in the event of an accident. Now, some of these features make perfect sense.

You have the typical fire extinguishers, emergency exit windows, exit doors between cars, and door release mechanisms… only, Tri-Rail’s taken things a little bit further in potentially nonsensical ways.

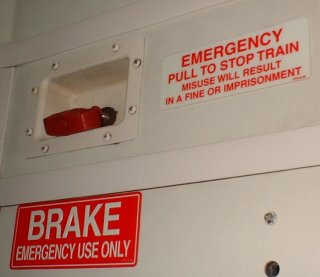
Here’s the first bit of utter nonsense one will find aboard the trains…


This isn’t uncommon at all aboard trains; I think the emergency brake is probably required by some ancient and outdated federal regulation somewhere. My only concern is… why the heck did they put it there? I bet more than once, someone’s lost their balance on that little set of steps and snagged the brake handle on the way down. On some of the older UTDC-made coaches, I also remember there being brake handles like that simply dangling from the ceiling at the ends. Nice.

The only reason I can see for having those handles, anyway, is to allow someone to stop the train if the motorman somehow manages to fall asleep or otherwise become incapacitated at the controls, AND manages to fall on the safety pedal that keeps the brakes from being automatically set anyway. Modern signalling systems would also stop the train automatically if needed. So yeah… if anyone can tell me otherwise, go ahead, but for now, I’m going to declare them obsolete.

But that’s not the least of the weirdness. Here’s the little gem that stood out in particular:


This is a little strip of plastic above a window, seperate from the mechanism on the same window that allows it to be removed from the side of the train as an emergency exit. What it does, nobody knows. It’s right in a place where it’s sure to be accidentally used as a handle by someone who’s lost their balance while getting out of the seats below, though. My guess is it’s nothing more severe than a trigger for an alarm bell, but the warning on it seems a little too harsh for that. “Penalty for misuse: Fine or imprisonment”.

Nevermind the fact that it does not state which sort of emergency it’s to be used in… I think it really makes about this much sense:

Posted in Geeking Out, Technology, Uncategorized on October 3rd, 2005

For those of you out there who enjoy listening to weird crap on the airwaves… you may note that E22 now uses “Bravo November 2″ as a call-up.

Let it be known that we here at Bravo November are most amused.

(We? Yeah… me, and my multiple personalities. Yes.)

How to go INSANE, in a few easy steps…

Posted in Geeking Out, Technology, Uncategorized on September 11th, 2005

Or, “How to repair the mirror box squeak on a Canon AE-1″.

NOTE: This procedure is applicable to ALL Canon A-series cameras, however, each one differs. Be sure to get the service manual for the proper model before starting!

I regret not taking more photographs of this procedure… however, I do have another AE-1 around that could use it, so this post will probably be updated with more photos when I do it on that one.

Background: The Canon AE-1 was one of the most advanced cameras made, at the time when it came out. It was one of the first cameras to use digitally timed shutter speeds, replacing a whole pile of mechanical linkages with a ‘microprocessor’ timing circuit (more like a bunch of shift registers, if you ask me… but hey…) and electromagnets to control the shutter curtains.

Unfortunately, there’s one part in there that wasn’t lubricated with the most advanced lubricant available at the time… the mirror damper.

To reduce the ‘mirror slap’ which otherwise occurs when the mirror assembly is flicked up and down by the springs, Canon fitted a rotary damper, which works a bit like the governor on a music box. The last step of this mechanism is a small brass flywheel, which runs on a metal shaft. Over time, the lubricant on this shaft dries up and the wheel squeaks. It will initially just be a slight squeak, eventually, in severe cases, becoming a horrible squelch and finally throwing off the camera’s timing, or even jamming it completely!

There are instructions on the web for lubricating the mirror damper using a needle - I could not see ANY possible way this would work on the AE-1 Program I worked on!

Anyway, here’s my advice. If you’ve got the time and money to send the beast out for repair, do that.

If you don’t want to spend the money on the repair, or it absolutely must be working by tomorrow… set aside about four hours, a nice clear workbench, and a calm state of mind.

Tools required: Small Phillips screwdriver, soldering iron, synthetic lubricant, sewing pin/needle/small piece of wire, spanner wrench. The first three are available at Radio Shack; the fourth should just be lying around. The fifth is pretty exotic, but you can substitute the tips of a small pair of needle-nose pliers. If they aren’t small enough, you can use a grinder to reduce them to points.

Warning: If you’ve never soldered before, practice on a dead piece of gadgetry. The flex circuit boards in the AE-1 take VERY little heating to solder and desolder wires on, and WILL be damaged by excessive heat! It takes much less than 1 second to solder or desolder a wire connection on them.

First step: Get the appropriate service manual for your camera! For the AE-1 Program, the service manual is on this great page of information. (Thanks!) Put a battery in the camera and release the shutter, if it isn’t already.

Remove the camera back. On the AE-1, it comes off with a small latch at the hinge, as it was made to be user-interchangeable. Otherwise, just leave it on. Be careful not to hit the shutter curtains with your fingers or anything else!

Follow the service manual’s instructions to remove the top cover. On the AE-1 Program, the front fascia around the lens mount has to come off first, followed by all the gadgetry on the top of the camera. The wind lever has a strange nut on it that requires a spanner or pair of needle nose pliers to unscrew. The snap rings can be dealt with carefully with a small (jeweler’s-size) flat-blade screwdriver. Carefully peel off the leatherette on both sides. Lift up the top cover, desolder three wires to the flash shoe and PC connector, and you’re in. The bottom cover should be removed as well.

Then go through the service manual’s procedure to remove the mirror box. (I’m not going to try to describe it here.) You’ll be desoldering two more wires.

Finally, you’ll be able to remove the mirror box.
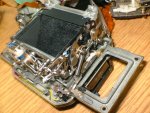
Canon AE-1 Mirror Box

The small brass flywheel is the only thing you should lubricate. Apply a small amount of lubricant (I used the Teflon/silicone stuff that comes in the Radio Shack ‘precision lubricator’ tube) to the ends of that by sticking a droplet to a needle or pin, then transferring that to the shaft at the end of the flywheel.

Before putting the mirror box back in, make sure the large electromagnet on the bottom is in its released position, and that the mirror release tab is in the right place. Otherwise the camera will not wind correctly. Before reinstalling all the screws/wires/etc, hold the mirror box in place, put the cam and lever back on the wind shaft, and make sure it winds correctly. (The wind lever must lock at the end of the stroke.)

Finally, you’re done… in one easy for me to say step… put it all back together again, and enjoy!

Fun with Gentoo on the VIA C3

Posted in Geeking Out on June 5th, 2005

The VIA C3 is a neat low-power processor, available in Socket 370 versions as well as on embedded motherboards (including the tiny Mini-ITX series). It was also, from what I’ve seen elsewhere on the web, used in some of the “Microtel” Lindows PCs sold by Wal-Mart.

Update, to disambiguate things: The Nehemiah core and later fully support the CMOV instruction mentioned below! As far as I know, you can use i686 as the CHOST for those. (Please let me know if this isn’t the case.)

Unfortunately, it’s got one serious oddity that will trip you up under some conditions when attempting to install Linux on the C3 system. The C3 identifies itself as being an i686-class processor with MMX, SSE, and 3DNOW feature sets. Pre-’Nehemiah’ core C3s are missing an instruction that is present on proper i686 chips! The instruction in question is CMOV, which may be present in code compiled for an i686 platform.

I first discovered this when using the Gentoo Linux LiveCD to install on a C3 system. The core in mine is the older Via Samuel 2, on a Syntax brand board. (A sticker on top of the cooler calls it a “1.3GigaPro” or such oddness.) On this CMOV-less core, the kernel booted ok, the proper init dance was danced, but attempting to chroot led to an illegal instruction error!

A quick search revealed that some other users had run into this same problem. It was mentioned on the Gentoo forums how to fix it on an already running system, but not on one that hadn’t been installed yet!

From searching around on the web, I saw that newer versions of Redhat were built to avoid CMOV on these chips, and just on a hunch, guessed that such a fix might have trickled down to the newer Fedora Core releases. I’d already had the 5-cd set downloading via Bittorrent so I could burn it off for a fellow follower of the great penguin, and the rescue disc of the set (about 100 megs) had already finished. I burned that to disc, and it allowed me to get up in a bootable LiveCD environment like Gentoo’s CD does.

At the point where it asked whether or not I wanted to mount the existing partitions (I had sucessfully partitioned it *before* running into the CMOV bug), I selected Skip. Voila… I had a shell with networking functional. From there, the usual steps of creating /mnt/gentoo and mounting the partitions worked, and I was able to chroot into the new environment set up from the Stage 1 x86 tarball. (NOT the i686 tarball, of course.)

Excellent! Things were looking up so far. I found some various suggestions for the choice of CFLAGS for this system, and there seemed to be some disagreement over whether it’s better to use -Os to minimize cache misses (64kb cache? Ow!) or some other optimization level. I chose -Os… I can always play with this later.

Here’s what I wound up with:
CHOST=”i586-pc-linux-gnu”
(This is very important - you MUST use i586 or the system will attempt to use CMOV, which is, of course, broken!)
CFLAGS=”-march=c3 -mmmx -m3dnow -fomit-frame-pointer -Os -pipe”
(Yes, it really does appear to support 3dnow. Newer ones do SSE as well. And, if you’ve got GCC 3.3 or newer, you can use -march=c3 - otherwise, use -march=pentium-mmx. Gentoo uses 3.3 by default on new systems, so there’s no problem there.)
CXXFLAGS=”${CFLAGS}”
(since there’s really no reason to have different flags for C and C++…)

Things appear to be working well so far - it’s in the bootstrap stage, and nothing’s exploded. Now, if only I didn’t have the guts of two computers spread across my bed, I wouldn’t have to go to sleep on the couch this morning…

Ahh, just when I thought I had it easy…
Ran into a stupid portage bug that stopped glibc from emerging during the bootstrap stage. The solution appears to be here (along with exactly the same error I recieved). Once I got past that, it’s been smooth sailing from there on out.

I’ve almost forgotten how nice it is to have a system that doesn’t require utterly exotic CPU cooling. My, this thing runs quiet!


Akismet has protected Bravo November from 125,810 spam comments.